In real estate, that first impression almost always happens online. And it’s your Multiple Listing Service (MLS) photos that serve as the digital handshake with potential buyers. Meeting MLS photo requirements isn’t just about checking a box to avoid fines or listing delays—it's a fundamental sales strategy that has a direct line to your visibility, showing requests, and the final offer price.
Why Compliant MLS Photos Are Your Strongest Sales Tool
Stop thinking of your listing photos as a simple gallery. They are your property's 24/7 digital open house. When a buyer is scrolling through dozens of listings, it’s the crisp, clear, and compelling photos that make them slam on the brakes and click for a closer look.
This is exactly why getting the MLS photo requirements right is so important. The rules are there to create a level, professional playing field and ensure every property is shown accurately. Nail these guidelines, and you’re already on the path to a faster, better sale.
The Strategic Advantage of High-Quality Imagery
High-quality, compliant photos give you a serious competitive edge. It's simple: listings with professional photography spark more interest, which almost always means more showings and, you guessed it, higher offers. Better photos get better results. Period.
The requirements usually boil down to three main things:
- Resolution and Clarity: Your images have to be sharp. No pixelated or blurry shots. This makes sure the property looks fantastic whether it's viewed on a giant monitor or a tiny phone screen.
- Photo Count: Most MLS platforms have a minimum number of photos required. Hitting or, even better, exceeding this number shows you're thorough and have nothing to hide. It gives buyers a complete tour from the comfort of their couch.
- Branding Restrictions: This one is a biggie. The rules almost always forbid adding your logo, headshot, or contact info directly onto the images. It keeps the focus entirely on the property and creates an unbiased experience for everyone.
Think of the MLS rules not as limitations, but as a quality-control guide. When you see them that way, a simple compliance task becomes a powerful marketing move designed to attract the best, most qualified buyers.
Just as compliant MLS photos are a powerful sales tool, understanding the power of compelling property photos is also a game-changer for boosting bookings in the short-term rental market.
Building Your Professional Reputation
Here’s the long-term play: consistently uploading excellent, compliant photos does more than just sell one home. It builds your reputation as a sharp, detail-oriented professional.
Sellers absolutely notice the quality of your marketing. Every well-presented listing becomes another entry in your portfolio, attracting future clients and setting you apart from the competition. When you treat every photo as a crucial part of your sales kit, you're not just investing in your current listing—you're investing in your career.
Understanding the Core Technical Photo Requirements
Your MLS photos are the digital curb appeal for your listing. They're the first thing buyers see, and they have to be sharp, clear, and inviting enough to make someone stop scrolling. Getting the technical specs right isn't just about following rules; it's about making sure your property looks incredible on every single website and device out there.
These rules create a level playing field. But more importantly, they ensure your hard work pays off with photos that are compliant, compelling, and actually get seen. Let's get into what that means in practice.
Mastering Resolution and DPI
Think of image resolution as the amount of detail packed into a photo. It’s the difference between a grainy old TV show and a crystal-clear 4K movie. More pixels mean a sharper, more immersive picture that lets buyers zoom in on the details that matter, like the grain on the hardwood floors or the finish on the kitchen taps.
Sure, most MLS platforms have a minimum resolution, but hitting the bare minimum is a losing strategy. Always aim for the recommended resolution.
- Minimum Resolution: This is the absolute floor, often around 1024x768 pixels. Anything less will likely get rejected or look blurry and amateurish, killing a buyer's interest before it even starts.
- Recommended Resolution: This is where you want to be. Aim for 2048x1536 pixels or higher. This size looks fantastic on big monitors and gives syndication sites like Zillow and Redfin a high-quality source file to display.
You'll also hear the term DPI (Dots Per Inch). While critical for print, its role online is simple: 72 DPI is the universal standard for web images. Saving your photos at this setting keeps file sizes down without sacrificing a pixel of on-screen quality.
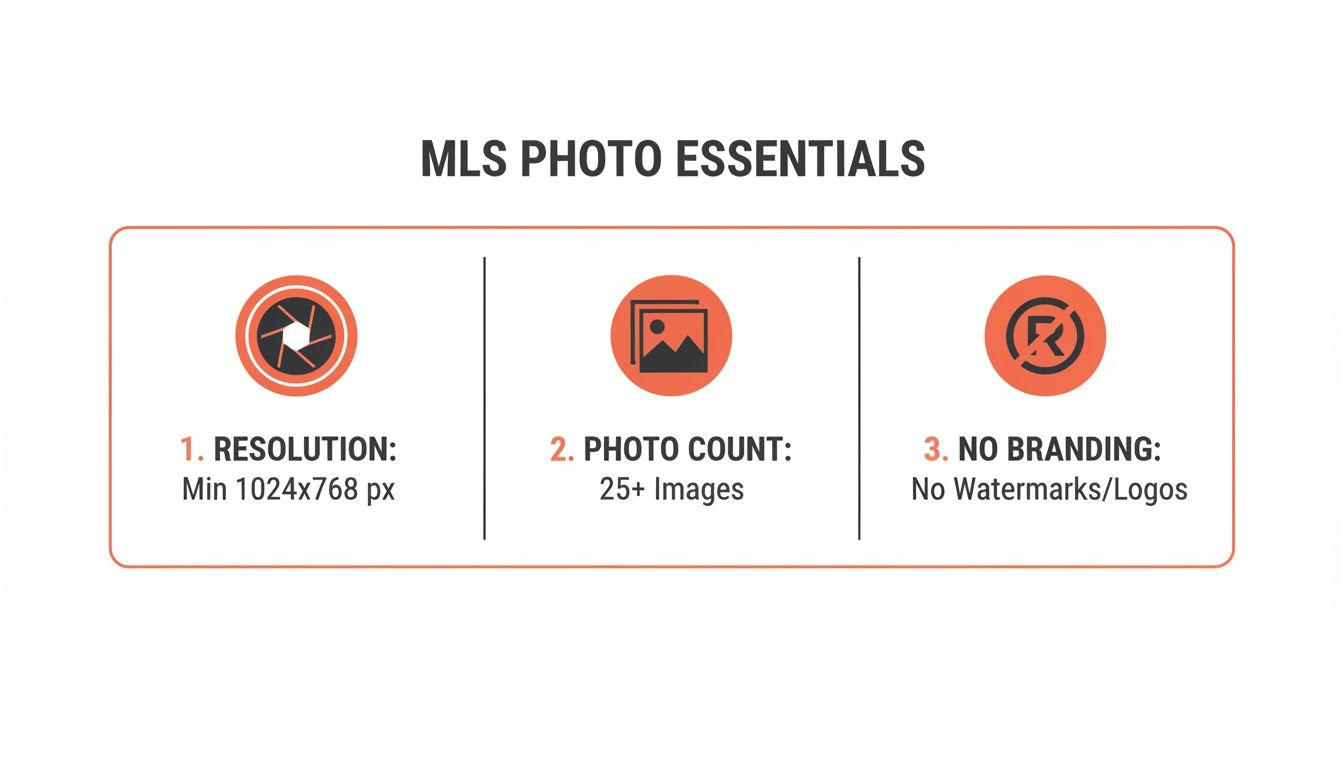
Resolution, photo count, and zero branding—these are the three non-negotiables for every successful MLS listing.
File Format and Size: The Balancing Act
Once your photos are crisp and high-res, they need to be saved in the right format and size. It’s like putting your photos in the perfect envelope—too big, and the mail service (the MLS) won't take it.
The industry standard, hands down, is JPEG (or .jpg). It delivers an excellent balance of image quality and manageable file size, which is absolutely critical for fast page loads. Stick with JPEGs. It's your safest and most reliable bet.
The real challenge is keeping your image quality high while staying under the MLS file size limit. A perfect photo that's too big to upload is completely useless.
Most MLS boards cap the file size for each photo, usually somewhere between 5MB to 15MB. If your beautiful, high-resolution images are coming in larger than that, you'll have to compress them. Tools like Adobe Lightroom or even free online compressors can shrink the file size without a noticeable drop in quality. The goal is to get just under the limit while holding onto every last bit of detail.
This isn’t just about following rules; it’s about meeting buyer expectations. Across the U.S., most MLS boards now demand a minimum resolution of 1024×768 pixels at 72 DPI. But the market leaders are pushing for more. For example, CRMLS in California encourages agents to upload photos at 2048×1536 pixels and allows up to 75 photos per listing.
Why? The data is clear: listings with more photos sell 32% faster. With 87% of inquiries driven by that crucial first impression, mastering these technical specs is no longer optional. Read more about these evolving standards and what they mean for agents who want to compete.
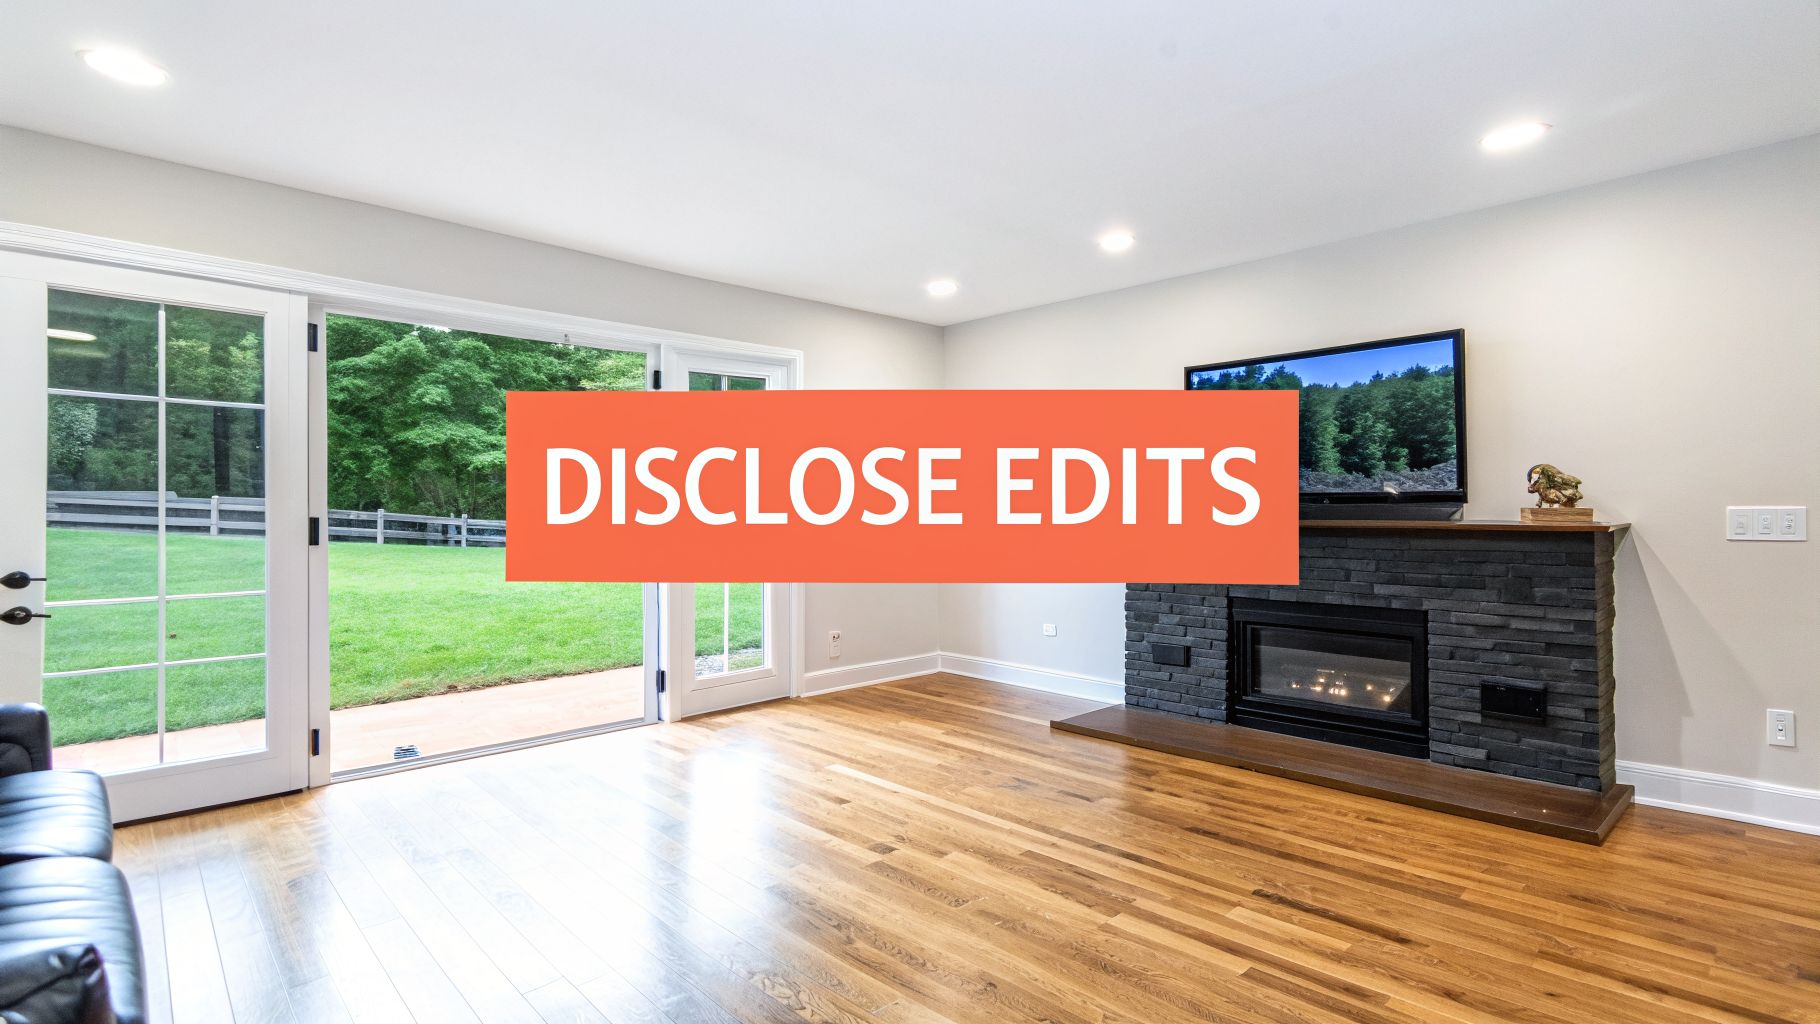
Navigating Virtual Staging and Alteration Disclosures
AI-powered visuals are giving agents some incredible tools to market properties, but they also open a new chapter in the rulebook for MLS photo requirements. This isn’t about just running a filter. We're talking about virtual staging, AI decluttering, item removal, and sky swaps.
Knowing the line between an acceptable touch-up and a misleading alteration is absolutely critical for staying compliant. These digital tools are powerful, but they all hinge on trust. When a buyer sees a photo, they assume it’s an honest picture of the property. The moment that trust is broken, you risk your listing, your reputation, and your license.
Let's break down the rules so you can use these tools to your advantage—the right way.
The Golden Rule: Enhancement vs. Alteration
Think of it like this: an enhancement makes the photo look better, while an alteration makes the property look different. This distinction is the core of almost every MLS and National Association of Realtors (NAR) guideline on photo editing.
Enhancements are fine because they help the photo accurately reflect the property’s true appearance. This includes standard professional edits like:
- Lighting and Exposure: Brightening a dark room to show its actual features.
- Color Correction: Making sure the wall colors in the photo match the colors in real life.
- Sharpness and Clarity: Cleaning up the image so it’s crisp and professional.
- Straightening Lines: Correcting lens distortion so walls and doorways are straight.
An alteration, on the other hand, changes the physical reality of the property. This is where you cross into territory that demands full and clear disclosure.
"A digitally altered image is one that has been edited to add, remove, or change elements of the property itself. This includes modifying furniture, fixtures, landscaping, or even the view from a window."
Making these kinds of changes without telling anyone is a major violation. The goal is to market a property's potential, not to create a fantasy that sets buyers up for disappointment the second they walk through the door.
What Requires Mandatory Disclosure
Any time you materially change what the property looks like in a photo, you have to disclose it. Period. Not doing so can get your listing pulled, land you some hefty fines, and do serious damage to your reputation. Transparency is always your best defense.
The most common alterations that demand a clear disclosure include:
- Virtual Staging: Adding digital furniture and decor to an empty space.
- Item Removal: Erasing personal items, clunky furniture, or even permanent fixtures like a built-in shelving unit.
- Structural Changes: Editing a photo to remove a wall, add a window, or change the flooring from carpet to hardwood.
- Landscape Alterations: Turning a brown lawn green, removing a dead tree, or adding a pool that doesn't exist.
- Sky Swaps: Replacing a gray, overcast sky with a perfect blue one. While it seems small, many MLS boards consider this a material alteration.
This isn't just a recommendation; in some places, it’s becoming law. California's AB 723, which goes into effect in 2026, mandates clear disclosure for all digitally altered real estate photos. Willful violations will even be treated as misdemeanors. This law is setting a new standard for the country as buyers become more skeptical of AI-generated images.
NAR’s own rules are on the same page, requiring "Virtually Staged" watermarks on every enhanced image. For a deeper dive into the specifics of this landmark legislation, you might be interested in our complete guide on California's AB 723 and AI photo compliance.
https://bounti.ai/blog/compliance/california-ab-723-ai-real-estate-photos
The stakes are high. In pilot programs, listings without proper labels saw a 40% higher complaint rate. It’s no surprise that savvy agents are using tools like Bounti, which automatically applies watermarks and provides original photos alongside edited ones, ensuring compliance in seconds. This is critical, as our data shows 65% of buyers now scrutinize listing photos for signs of AI manipulation. Discover more insights about how these regulations are reshaping real estate marketing and protecting consumers.
How to Disclose Alterations Correctly
Proper disclosure isn't hard, but it has to be clear and easy to spot. The most common and accepted method is to add a watermark or text overlay directly on the altered image.
Simple, direct phrases work best:
- "Virtually Staged"
- "Digitally Altered"
- "Image has been enhanced"
Another best practice—and a requirement in some areas—is to include the original, unaltered photo in the listing gallery right after the edited version. This offers total transparency. It shows buyers both the property's current state and its exciting potential, building trust and helping you avoid any hint of misrepresentation while keeping your MLS photo requirements totally buttoned up.
Common MLS Photo Violations and How to Avoid Them
Getting your photo dimensions and file sizes right is only the first step. Where most agents get into trouble isn't with the technical specs, but with what’s actually in the photos.
Content violations are surprisingly common. They’re the little details that can get a listing pulled and an angry phone call from the MLS compliance department. The good news? They’re easy to avoid once you know what to look for.
Think of it this way: the property is the star of the show. Your photos are the stage. Anything that steals the spotlight—whether it’s your logo or a misleading camera trick—is a potential violation that can jeopardize your listing and your commission.
The Cardinal Sin of Branding and Contact Info
By far the most common mistake we see is branding. The MLS is built to be a neutral, level playing field for all members. That means any personal or brokerage branding is strictly off-limits in your listing photos.
We’ve all seen it happen. An agent thinks it's clever marketing to plaster their phone number on the hero shot, only to have the listing suspended. It’s a classic blunder. Any attempt to steer buyers away from the official MLS channel is a serious no-go.
To stay compliant, make sure every single photo is completely clean of:
- Logos: This means no brokerage logos, no personal brand watermarks, nothing.
- Yard Signs: This one gets people all the time. Check your exterior shots. If your "For Sale" sign with your name and number is visible, that photo will be flagged.
- Agent Photos or Videos: Your headshot belongs on your business card, not in a property photo. The same goes for links to video tours where you’re the on-screen host.
- Contact Information: Never add your phone number, email address, or website as text on an image.
The rule is simple: if it promotes you or your brokerage instead of the property, it doesn’t belong. Save the marketing for your website and social media, not the shared MLS database.
Misleading Content and Misrepresentation
Beyond branding, your photos have to be an honest-to-goodness representation of the property. This is where things can get a little gray, and where agents can trip up without even realizing it. The goal is to show the home in its best light, not to create a fantasy that sets buyers up for disappointment.
One common issue is the overuse of a wide-angle lens. Sure, it can help capture the scale of a room, but extreme distortion can make a space feel deceptively huge. If your photo makes a cozy 10x10 bedroom look like a grand ballroom, you’re misrepresenting the property.
Another major red flag is using old photos. Whether they're from a previous listing or just from last summer, it's a huge problem. The photos must reflect the property as it is right now. If the walls have been repainted or the seasons have changed, you need new pictures. It's about building trust and making sure everyone's time is respected.
Your Checklist for Perfect MLS-Ready Photos
Knowing the rules is one thing. Putting them into practice every single time? That's the real challenge. The only way to guarantee every photo you upload is compliant and ready to attract buyers is to have a repeatable workflow.
This simple, three-phase checklist is your guide to getting MLS photo requirements right every time, without the guesswork.

We'll walk through Pre-Shoot Preparation, Photo Review and Editing, and the Final MLS Upload.
Phase 1: Pre-Shoot Preparation
Great listing photos start long before you pull out the camera. A little prep work upfront not only produces better shots but also saves you from attempting risky digital fixes later.
- Declutter and Depersonalize: Work with your sellers to put away personal items—family photos, kids’ artwork on the fridge, and general clutter. A clean, neutral canvas makes rooms look bigger and more inviting on its own.
- Stage for Success: Whether you bring in a pro stager or just rearrange the existing furniture, make sure every room’s layout highlights its flow and purpose. A well-staged room tells a story; an empty one just feels vacant.
- Hunt for Reflective Hazards: Do a quick walkthrough and look for mirrors, glossy appliances, and windows. These are notorious for catching unwanted reflections of you, your camera, or your yard sign.
Phase 2: Photo Review and Editing
Once you have the shots, it’s time to review them for compliance before they get anywhere near the MLS. This is your chance to catch mistakes and make ethical enhancements.
Think of this as your quality control station. A few minutes of review here will save you from a compliance warning or the embarrassment of a poorly presented listing.
Your review needs to hit two key areas: the technical specs and the content rules.
Technical Compliance Check:
- Resolution: Are your photos at least 1024x768 pixels? For the sharpest look, you should be aiming for the recommended 2048x1536 pixels.
- File Size: Is each image under your MLS's cap? This is usually between 10-15 MB.
- File Format: Are all your photos saved as JPEGs?
Content Compliance Scan:
- No Branding: Scan every pixel for logos, watermarks, or your contact info. Check those reflective surfaces you spotted earlier—they’re the usual suspects.
- No People or Pets: Make sure no one (two-legged or four-legged) made an accidental cameo in your shots.
- Accurate Representation: Do the photos honestly show the property's current state? Ditch any shots with extreme wide-angle distortion that make a closet look like a ballroom.
- Sequence for Storytelling: Always lead with your best exterior shot—this is your thumbnail and first impression. From there, create a logical tour that walks buyers through the home: entryway, living room, kitchen, primary bedroom, and so on.
- Label Altered Images: If you’ve used virtual staging or made other significant alterations, this is your final chance to add the required disclosure. A simple, clear watermark like "Virtually Staged" on the image is all you need.
- Double-Check the Live Listing: The moment you hit "submit," pull up the public view of your listing. Make sure every photo is there, they’re in the right order, and they look crisp and professional on screen.
- Perfect Exposure and Color: Bounti automatically corrects the lighting and color balance, making every room feel bright and true-to-life without ever misrepresenting the space.
- Ideal Resolution and File Size: Every photo is generated at the perfect resolution for a crisp, clean look on any screen, while the file size is optimized for quick, error-free uploads.
- No Branding: Your drone shots must be completely clean. That means no logos, no watermarks, no text, and no contact info.
- Respect Privacy: It’s great to capture the neighborhood vibe, but don’t get creepy. Your photos shouldn't zoom in or focus heavily on a neighbor's private yard or windows.
- Get Certified: This part is not a suggestion. The person flying the drone must be FAA Part 107 certified for any commercial work. Hiring an uncertified pilot is a massive liability for you and your brokerage. Don't risk it.
For agents using more advanced tools, this is also where you can make compliant edits. If you’re curious about what’s out there, our guide on the best AI photo editing software breaks down the tools that can make this step much easier.
Phase 3: Final MLS Upload
The last step is to upload your perfected photos in a way that tells a story and follows display rules. Don't just dump them in a random order; be strategic.
How Bounti Automates MLS Photo Compliance
Let’s be honest. Juggling the technical specs, content rules, and disclosure laws for MLS photos is a huge drag. After all the work you put into a listing, the last thing you need is a compliance warning for a branding slip-up or a wrongly watermarked photo. This is exactly where automation stops being a buzzword and starts being an agent's best friend.
We built Bounti to get rid of these headaches entirely. It handles the entire compliance workflow for you, taking all the guesswork out of meeting MLS photo requirements and giving you back hours of your day.
From Video to Compliant Photos, Instantly
It all starts with a simple video walkthrough of the property. Just one video. From there, Bounti’s AI assistant automatically generates a full set of high-quality stills. These aren't just random screenshots—they are carefully selected and perfected.
This means you can forget about fiddling with photo editing apps or compression software. You get a complete gallery of MLS-ready photos in minutes. And when you have that full set of images ready to go, it's helpful to know how to upload photos effectively to make the final step as smooth as possible.
Built-In Compliance for Alterations
Today, the biggest compliance landmine is digital alteration. Bounti’s virtual staging, decluttering, and restyling tools are incredibly powerful, but we built them with compliance as the top priority.
When you use Bounti to virtually stage a room or remove a bit of clutter, the platform automatically adds the required disclosure watermarks—like "Virtually Staged"—to the altered image. It also saves the original photo, giving you everything you need for 100% transparent marketing.
This single feature changes everything. It means you can show off a property's true potential without ever losing sleep over NAR guidelines or state laws like California's AB 723. The system handles the disclosures for you, protecting both your listing and your reputation. By automating these crucial steps, Bounti frees you up to do what you actually do best: win clients and close deals. To see this automation in action, check out how everything works together in the Client Studio feature.
Frequently Asked Questions About MLS Photos
Even when you know the rules inside and out, weird situations pop up. It happens. Getting these edge cases right is what separates the pros and keeps your listings from getting flagged.
Here are the real-world questions we hear from agents all the time, answered with no-nonsense, compliance-first advice.
Can I Reuse Photos From a Previous Listing?
Let's make this simple: no. In almost every situation, the answer is a hard no. Most MLS boards are sticklers for one thing above all else—photos must show the property's current condition. A fresh coat of paint, a new fence, or even just different landscaping means old photos are a misrepresentation.
But there’s an even bigger issue here: copyright. The photographer who shot those original images owns them, period. Reusing their work on a new listing without their explicit, written permission isn't just bad form, it's a serious copyright violation that can land you in legal and financial trouble. Always get new photos.
What Are the Rules for Drone or Aerial Photography?
Drone shots are an incredible way to show off a property's scale and setting, and most MLS platforms love them. Just remember, they have to follow the same core rules as every other photo.
Why Do My High-Resolution Photos Look Blurry on the MLS?
It's one of the most frustrating things in real estate marketing. You upload a gorgeous, tack-sharp photo, and the live listing looks like it was shot on a flip phone. What gives? The culprit is almost always the MLS system's own aggressive, one-size-fits-all compression.
When you upload a file that’s too large, the system automatically crushes it down to size, and image quality is the first casualty.
The fix is to take control before you upload. By pre-sizing your images to the MLS's preferred dimensions (like 2048x1536 pixels) and saving them as high-quality JPEGs at 72 DPI, you beat the system. What you upload is what buyers will actually see.
Ready to eliminate compliance headaches for good? Bounti is your AI assistant for creating stunning, perfectly compliant marketing materials in minutes. From a single video, get a full set of MLS-ready photos, virtually staged images with automatic disclosures, and compelling property descriptions—instantly. Stop wasting time and start winning more listings today.