You've finished the shoot. The card is full. The living room looks strong, the kitchen is usable, the bedrooms are repetitive, and the exterior set needs help because the sky shifted halfway through the walkthrough. Now the demanding work commences.
Agents don't need “edited photos” in the abstract. They need an MLS-ready package, a few standout hero images, social variants, and sometimes staged alternatives for rooms that feel empty, dated, or cluttered. That's why a solid photo editing workflow isn't just a retouching habit. It's a production system that takes one property from raw capture to listing assets without chaos, missed details, or inconsistent results.
Generic photography advice usually stops too early. It covers sliders, presets, and artistic taste. Real estate teams need something stricter: a workflow that handles volume, keeps edits believable, and supports the full listing lifecycle. That includes traditional correction, batch efficiency, and AI tools that solve property-specific problems ordinary portrait or outdoor workflows don't address.
From Camera Card to Client-Ready
You wrap a twilight shoot at 7:10, the agent wants finals by morning, and the property still needs more than basic correction. The spare bedroom is empty, the garage shot has distracting storage bins, the exterior set spans two different sky conditions, and marketing needs both MLS selects and a few stronger images for social. That is the starting point of a real estate photo editing workflow.
A workable process has to carry one listing from raw capture to approved deliverables without reopening the job over and over. In practice, that means building for the full asset set from the start: MLS-ready images, hero shots, resized marketing versions, and alternates for rooms that need decluttering, virtual staging, or restyling. If you bracket exposures on site, that planning starts even earlier, because your capture choices affect how quickly the set can be merged and corrected later. Teams that rely on HDR photography for real estate listings feel this immediately.
What changes in real estate
General photography workflows usually stop at “final edited image.” Listing work does not. A property package has business constraints attached to it, and the editing order should reflect that.
- Turnaround drives the schedule. Agents care about speed because the listing clock is already running.
- The set has to match. A bright kitchen and a moody hallway make the gallery feel careless, even if each frame looks fine on its own.
- Believability matters. Clean corrections help the home sell. Misleading edits create problems for the agent.
- One shoot feeds multiple outputs. The same source images often become MLS files, brochure images, social crops, and AI-staged variants for hard-to-sell rooms.
That changes the goal. The target is not “finish editing photos.” The target is “deliver the right package for this listing.”
I run teams with that rule in mind because it cuts waste fast. If editors treat MLS, social, and staging requests as separate jobs, the property gets touched too many times, file versions split, and delivery slows down. A tighter workflow builds one clean base set first, then creates approved variants from that same organized source.
Run the job like production, not rescue
Strong real estate editing workflows look more like operations than art school. Each property moves through intake, selection, baseline correction, room-specific fixes, variant creation, export, and delivery approval. The handoff points matter because they prevent the usual failure points: missed rooms, inconsistent white balance, duplicate exports, and late requests for “just one staged option” after the gallery already went out.
The other shift is broader than editing alone. Real estate teams now have to account for problems traditional workflows ignore, especially vacant rooms, dated finishes, and visible clutter that drag down listing performance even when the photography is technically solid. AI belongs in that system because it solves those property-specific issues at the asset level, without sending the job into a separate creative process.
Done means more than corrected. Done means the listing has the files it needs to go live, market well, and stay consistent across every channel.
The Foundation Import Culling and Organization
A listing can go off track before anyone touches exposure or white balance. The usual failure point is intake. Files land in the wrong folder, brackets get split, the drone set is mixed into interiors, and the team spends more time sorting than editing.
That cost shows up later in the listing lifecycle. MLS selects get delayed, social crops are built from the wrong master, and vacant-room variants or declutter requests start from files nobody labeled clearly in the first place.
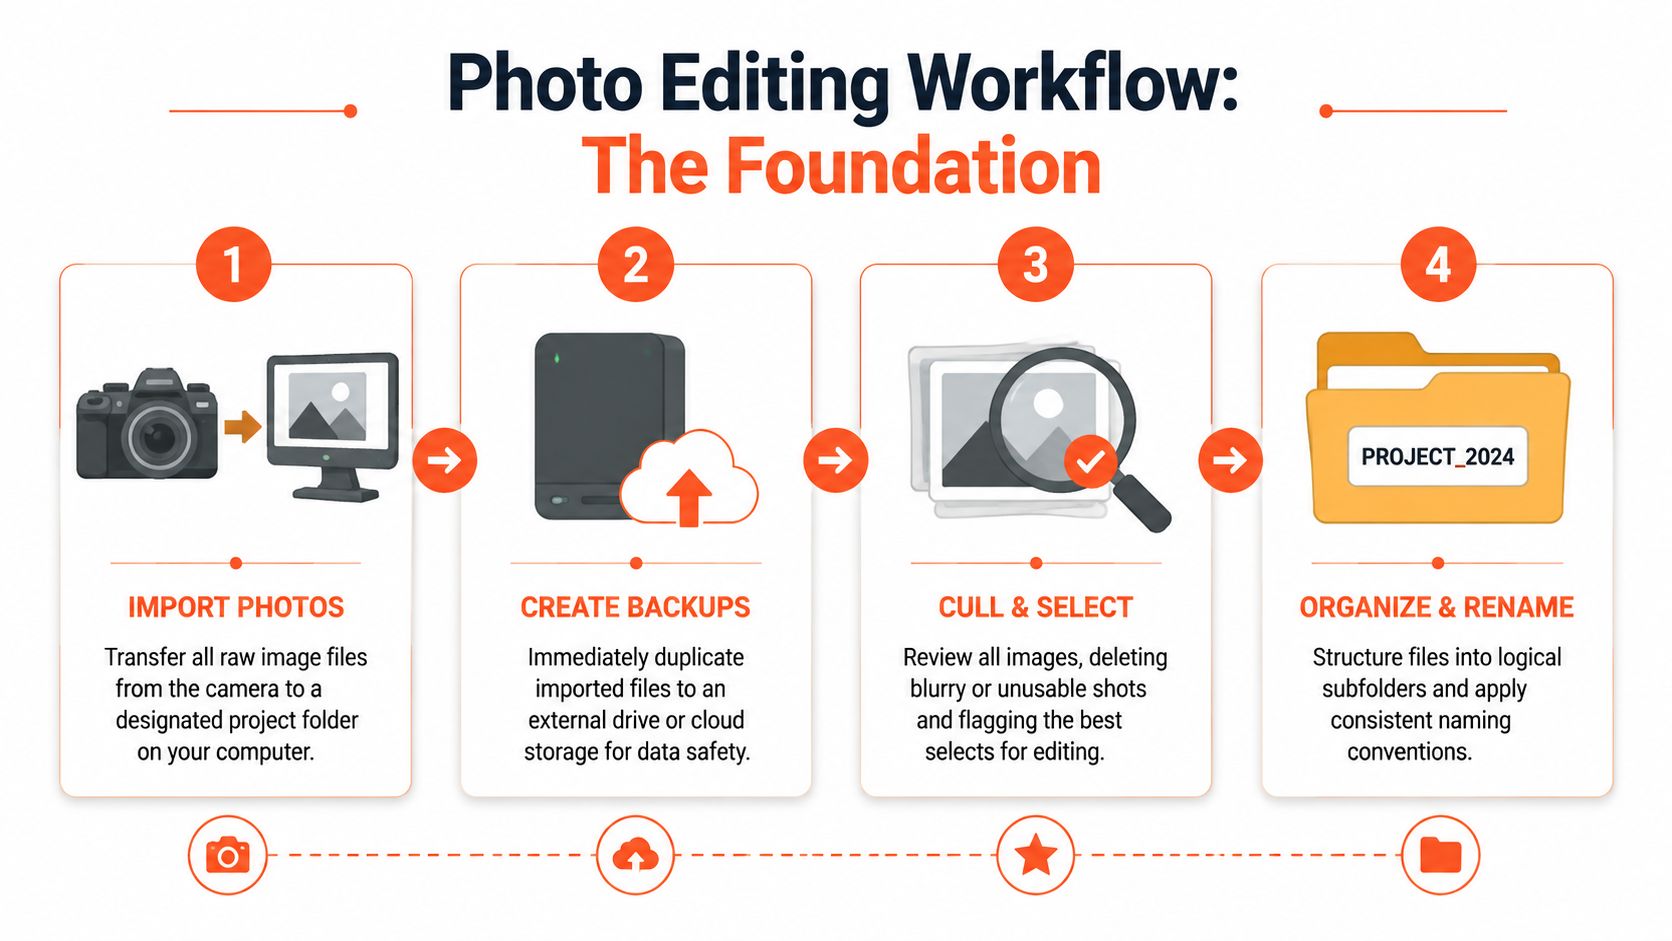
Build a folder system that survives volume
Use a structure that another editor can understand in ten seconds. I want every property organized the same way: raw capture, selects, working edits, finals, and variants. Variants matter in real estate because the job rarely ends with one finished gallery. The same listing may need MLS-ready files, branded marketing images, virtual staging options for empty rooms, and decluttered versions for paid campaigns.
Keep naming simple and sortable. Date, address or listing ID, room name, and sequence number usually covers it. A file named 2026-04-18_123Main_Kitchen_03 is easier to route, review, and re-export than a camera default filename or a vague label like final-final-2.
If your team shoots brackets, panoramas, drone, and detail shots on the same property, separate them at import. That one habit prevents bad merges, broken sync settings, and missed source files when someone has to edit real estate photos for multiple deliverables under a deadline.
Cull before you edit
Editing starts with selection, not sliders.
Cull the set while the shoot is still fresh in memory. Reject soft frames, flash misses, partial compositions, duplicate angles, and any image that creates doubt about room size or layout. Real estate buyers read pictures fast. One weak frame can make the whole listing feel less polished.
A practical first pass looks like this:
- Remove technical misses. Out of focus frames, clipped compositions, mixed lighting failures, motion blur.
- Choose one angle per purpose. One hero kitchen, one best primary bedroom, one strongest exterior approach.
- Keep room coverage intact. Do not over-cut and leave the agent without a needed bathroom, utility room, or backyard angle.
- Mark special-purpose files early. Empty rooms that may need staging, cluttered spaces that may need cleanup, and wide shots that will be used for ads or portals.
That fourth step is where real estate workflows usually break from general photography. A vacant living room is not just another frame to color-correct later. It is a likely staging candidate. An occupied bedroom with visible bins and cords is not just a retouching note. It may need an AI declutter pass before the marketing team builds campaign assets. Tag those images at cull, not after the gallery is supposedly done.
For bracketed interiors, keep each exposure set together from import through selection. If that is part of your process, this guide to HDR photography for real estate is useful because it treats HDR as a production decision tied to delivery quality.
Use ratings that drive handoffs
Ratings only help when everyone uses the same rules. I prefer a simple ladder tied to action, not taste.
| Rating | Meaning |
|---|---|
| X | Reject |
| 1 star | Backup only |
| 2 stars | Usable support image |
| 3 stars | Final candidate |
| 4 stars | Approved for delivery set |
| 5 stars | Hero image or marketing priority |
Color labels can handle workflow status. For example, yellow for needs window pull, blue for staging candidate, green for approved final. That gives editors, coordinators, and marketers a shared operating language without opening every file.
Hero tagging needs discipline. Front exterior, kitchen, main living area, and the best lifestyle angle usually deserve the first pass. The point is not artistic debate. The point is making sure the images that sell the listing, and the images most likely to need marketing variants, are easy to find fast.
Priority Edits for Professional Listings
Once the selects are locked, the editing sequence matters more than any individual tool. Most messy real estate edits come from doing local fixes too early, pushing color before the tonal baseline is stable, or correcting windows and shadows on images that still have crooked verticals.
Industry guidance is clear on the order. A technically sound workflow should be global-first, local-second, meaning white balance, exposure, and other image-wide corrections come before masked or region-specific work so the file has a stable baseline, according to Cambridge in Colour.
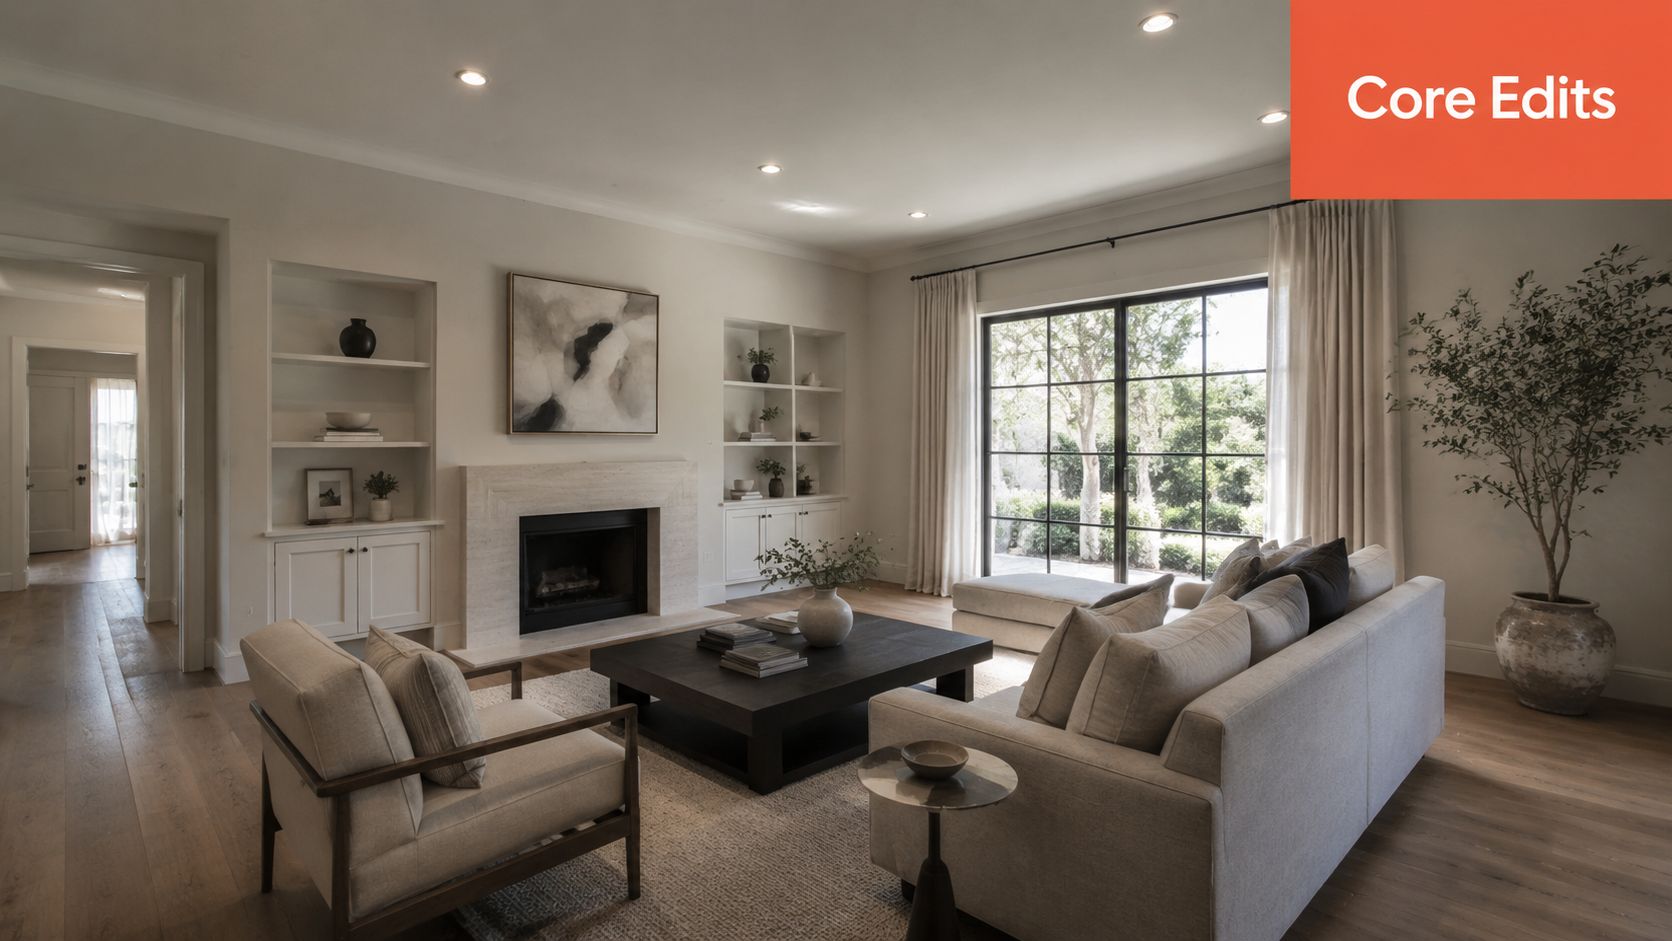
Correct geometry before style
Perspective correction is essential in interiors. If the walls lean, the room feels amateur even if the color is perfect.
Start by fixing:
- Vertical lines so walls, cabinets, and door frames look architectural
- Horizon and level so countertops and window lines don't sag
- Lens distortion so room proportions feel credible
Do this first because every later decision depends on the room reading correctly. If you crop before correcting geometry, you'll often crop twice.
Set the tonal baseline
After the frame is straight, work globally.
That usually means broad corrections in this order:
| Edit priority | What you're looking for |
|---|---|
| White balance | Neutral walls, believable wood tones, clean cabinetry |
| Exposure | Bright without flattening the room |
| Contrast and tone | Separation between surfaces without crunchy shadows |
| Color balance | Controlled greens, skies, flooring, and paint colors |
Watch the histogram when you do this. A common failure in interior work is forcing dark rooms too far too early, then trying to clean up the noise later. It's usually faster to build a balanced file first and reserve targeted lifting for the exact areas that need it.
If the image only looks good because the shadows are pushed too hard, it won't survive close review on a large screen.
Save local work for the files that earn it
Once the batch has a stable look, move to image-specific refinements. These include window pulls, selective brightening, fireplace cleanup, TV screen control, and ceiling hotspot corrections.
Not every frame deserves the same effort. Put your time where buyers and sellers will notice it:
- Hero images get the most precise masking and cleanup
- Core room images get clean, restrained local balancing
- Support images should stay efficient and consistent
For agents who want a practical comparison of manual edits and common enhancement techniques, this guide on how to edit real estate photos is a useful companion read.
A good rule is simple: if a local adjustment makes the room feel cleaner and more readable, keep it. If it starts calling attention to the edit, back it down.
The AI Advantage Declutter Staging and Restyling
A photographer finishes a clean shoot, the exposures are solid, and the verticals are straight. The listing still underperforms because the kitchen counters are crowded, the living room is empty, and the primary bedroom looks dated. Those problems sit inside the marketing workflow, not the camera settings.
This distinction is important because many listings do not lose buyers over white balance. They lose attention when rooms feel smaller, busier, colder, or harder to imagine living in. A modern real estate editing workflow has to solve for that full listing lifecycle, from capture through MLS-ready delivery and channel-specific variants.

Use AI where manual editing slows the listing down
I do not use AI to replace judgment. I use it to remove repetitive production work and create approved variants faster.
In real estate, three jobs usually justify AI first:
- Decluttering for counters, cords, trash bins, pet items, and personal objects
- Virtual staging for empty rooms that need scale, purpose, and warmth
- Restyling for dated spaces when the goal is to show what the room could become in marketing
The trade-off is straightforward. Manual retouching gives tighter control on a hero image, but AI handles high-volume option generation far better when the client needs an MLS-safe version, a staged version for social, and a seller-facing concept set from the same source file.
That capability also allows listing teams to produce multiple marketing variants without re-shooting or opening a separate production track. The MLS gallery can stay conservative and accurate. The marketing package can include staged alternates for email campaigns, paid ads, property sites, and listing presentations.
One practical option in that workflow is Bounti Labs. It uses a single video walkthrough to generate stills, MLS-ready photos, and AI-based decluttering, staging, and restyling outputs. The operational value is clear. Fewer handoffs, fewer disconnected tools, and less time lost rebuilding the same listing in multiple formats.
Set rules before you scale it
AI can clean up a listing fast. It can also create images that cross the line from helpful to misleading.
Teams get into trouble when they treat every possible transformation as fair game. Decluttering a kitchen is one thing. Removing a damaged vanity, changing flooring that does not exist, or making a cramped bedroom read like a larger room creates a trust problem for buyers and a liability problem for the agent. This concern is raised directly in this discussion about editing boundaries and listing integrity.
Cleaner is fine. Clearer is fine. More marketable is fine. A false impression of the property isn't.
Use a simple decision filter:
| AI edit type | Usually safe when | Risky when |
|---|---|---|
| Decluttering | Removing temporary mess or distractions | Hiding material defects or permanent conditions |
| Virtual staging | Showing scale and use of empty space | Making buyers think staged furniture is included or hiding poor room proportions |
| Restyling | Presenting design possibilities in marketing variants | Implying renovations already exist |
Teams that need examples and software categories can review this guide to real estate digital staging, especially when setting internal rules on where staged versions should appear.
If you are deciding which tools belong in your core stack versus a specialty add-on, this overview of AI photo editing software for real estate is a useful comparison.
A quick demo makes the difference between correction and transformation easier to see:
The strongest teams treat AI outputs as marketing assets with rules, approvals, and channel-specific use. That is how you move from a good photo set to a listing package that sells the property.
Finalizing for Impact QC Export and Delivery
The last 10 minutes of a listing often decide whether the agent feels taken care of or slowed down.
A photo set can be beautifully edited and still create friction if the exterior hero is missing from the MLS folder, a virtual stage slips into the wrong deliverable, or the bedroom sequence jumps around with no logic. In real estate, delivery is part of the product. Buyers see the images, but agents judge the workflow by how easy it is to publish, promote, and repurpose the set across the full listing lifecycle.
Run QC at the listing level
Single-image review is not enough. The final pass needs to answer a broader question. Does the full gallery present the property clearly, consistently, and in a way the client can use without second-guessing anything?
Check the set in grid view first, then open the hero frames larger. That catches continuity problems fast without turning QC into another full edit session.
Use a short review standard:
- Exposure consistency across connected spaces and similar room types
- Color consistency so walls, cabinetry, and flooring do not shift from image to image
- Verticals and perspective corrected enough to look professional without making rooms feel distorted
- Retouch and AI artifact review for masking errors, repeated textures, soft edges, and fake-looking windows
- Version control so empty-room, decluttered, staged, and unstaged files are clearly separated
- Story order that matches how a buyer and agent expect to move through the home
This matters even more when AI variants are part of the package. Empty-room originals, decluttered finals, and staged marketing versions all need clean labels and channel-specific placement. Traditional photo workflows often stop at "final images." Real estate teams need a tighter finish because one listing can produce MLS assets, brochure images, social crops, paid ad creative, and alternate visuals for rooms that need help selling the space.
Export by use case, not by habit
One oversized export preset creates avoidable problems. Files upload slowly, agents post the wrong versions, and marketing teams end up resizing images by hand.
A better system starts with approved masters, then creates export presets for each destination:
| Delivery type | Recommended approach |
|---|---|
| MLS-ready gallery | JPEG, sRGB, web-sized files, clean filenames, no staged images unless the market and disclosure rules allow them |
| Website gallery | Same color space and order, with stronger hero selection and branded folder names if the client expects them |
| Social media | Crops made from approved finals, including vertical and square variants where needed |
| Print or flyer layout | Higher-resolution exports from the master set, with a quick sharpening and crop check |
| Marketing alternates | Separate folder for staged, decluttered, or restyled versions with explicit labels |
Preset discipline saves time, but it also protects the client relationship. Agents should never have to wonder which files belong in the MLS and which belong in promotion.
Delivery should match how agents actually market property
A single mixed folder creates support requests. A structured package gets the listing live faster.
The handoff should usually include:
- MLS finals
- Marketing variants
- Staged or restyled alternates
- Social-ready crops
- Archive or master set for internal use
For teams handling repeat clients, a branded delivery portal helps keep this organized. A system like client asset delivery for real estate teams makes it easier to separate approved finals from alternates, keep naming consistent, and reduce back-and-forth after the shoot.
Some brokerages also want ready-to-run promotion tied to the image set. In that case, pairing final visuals with an AI marketing campaign generator can speed up ad and social launch once the gallery is approved.
The best finalization step is the one that prevents client questions before they happen.
Scaling Your Workflow for Teams and Automation
Monday at 9:00 a.m., three new listings hit the queue at once. One photographer uploaded bracketed interiors, another sent mixed JPEGs and raws, and the coordinator already promised the agent MLS finals by noon. If your process lives in one editor's head, that morning turns into delays, mismatched edits, and avoidable client calls.
Teams need a production system. In real estate, that system has to cover the full listing lifecycle, from intake and editing to MLS-ready finals, staged alternates, social crops, and marketing handoff. AI helps, but only after the team agrees on what a finished listing package should look like.
Standardize taste before you automate volume
Automation scales your decisions. It also scales your mistakes.
Set the visual rules first. Document how the team handles exposure for interiors, mixed-light color, vertical correction, window pulls, sky replacements, lawn cleanup, and AI edits for cluttered or empty rooms. Real estate has more edge cases than other photo categories because the same image may appear in the MLS, on a flyer, in a social campaign, and in a restyled variant for paid promotion. One standard file is not enough.
A short style guide works if it includes examples. Show the difference between a support photo, a hero image, a decluttered version, and a virtually staged alternate. Editors move faster when they can see the target.
Build handoffs that survive real team volume
Workflow problems usually show up between roles, not inside them. The photographer names the job one way, the editor saves a different version set, and the coordinator delivers files with unclear labels. The result is rework.
Use fixed control points:
| Workflow stage | Team control point |
|---|---|
| Intake | Standard job naming, upload deadlines, and source file requirements |
| Culling | Shared select rules for hero images, secondary rooms, and utility shots |
| Editing | Presets, masking standards, and a review path for difficult exposures or heavy corrections |
| AI variants | Approved rules for decluttering, virtual staging, restyling, and disclosure |
| Delivery | Locked export presets, folder templates, and file naming by asset type |
This matters most on listings with variants. An empty bonus room might need three outputs: the true-to-property MLS version, a decluttered version for the property site, and a virtually staged version for marketing. Traditional editing workflows often stop at color and perspective. Real estate teams need a system that tracks which version is approved for which use.
Automate the repeatable work
Good teams automate setup, routing, and packaging. They keep human review on image choice, visual judgment, and anything that could misrepresent the property.
The best automation candidates are predictable tasks:
- project creation and folder structure
- ingest and assignment by listing
- batch syncing baseline corrections
- export sets for MLS, social, and print
- creation of approved decluttered or staged variants
- delivery packaging for agents, coordinators, and marketing teams
For larger operations, a shared workspace for real estate client asset delivery and listing coordination keeps those assets organized without relying on email threads and local folders.
Once the visual package is approved, some teams also push the same listing assets into promotion. An AI marketing campaign generator can help turn approved photos and variants into launch-ready ads and campaign copy without making the coordinator rebuild everything from scratch.
Bounti Labs fits that operating model in a practical way. It treats listing visuals as one part of a broader marketing workflow, including the handoff from edited photos to staged variants, property descriptions, and client-ready assets. That is the difference between editing faster and delivering a listing package that the team can scale.